How to Master Supervisible in Your First Week
Complete step-by-step guide to setting up Supervisible for agencies. Learn to define capabilities, add team members, create projects, and track profitability.
Quick Overview: Your 6-Step Setup Journey
Before diving into the detailed instructions, here's what you'll accomplish in this guide:
🏗️ Step 1: Define Team Capabilities Click: Company logo → Settings → Capabilities Set up the services your agency offers (SEO, web development, design, etc.) - this is the foundation for everything else.
👥 Step 2: Add Team Members Click: Left sidebar → Members → Add Member Invite your team via link or manually add them with their availability and roles.
🔗 Step 3: Assign Capabilities to Members Click: Back to app → Left sidebar → Members Connect team members to their skills - required before you can create any projects.
🏢 Step 4: Add Your First Client Click: Back to app → Left sidebar → Clients → New Client Upload client information (auto-scrapes from their website) and set priority levels.
📋 Step 5: Create Your First Project Click: Clients → Select client → New Project OR Left sidebar → Projects → New Project Set up project details, timelines, and choose your billing method (fixed price, retainer, or hourly).
📅 Step 6: Plan Resources & Assign Work Location: Inside your newly created project Allocate team members to the project and plan their weekly hours across the timeline.
⏱️ Total Time Investment: 20-30 minutes for a complete setup
🎯 End Result: Full visibility into team capacity, project profitability, and resource planning
Supervisible cuts through the complexity of managing both your team and finances. It gives you real visibility into unit economics, team planning, and out-of-office schedules all in one place. Whether you're tracking profitability, planning capacity, or managing time off, here are some expert strategies to get the most from the platform:
1-Start by defining what your team can do
Before you start planning projects and tracking financials, you need to tell Supervisible what your team can actually do. This step is crucial because it forms the foundation for accurate capacity planning and project allocation.
Step-by-Step Setup:
Step 1: Navigate to your company settings by clicking your company logo or name in the top-left corner.
Step 2: Click Settings from the dropdown menu.
Step 3: In the Settings sidebar, select Capabilities.
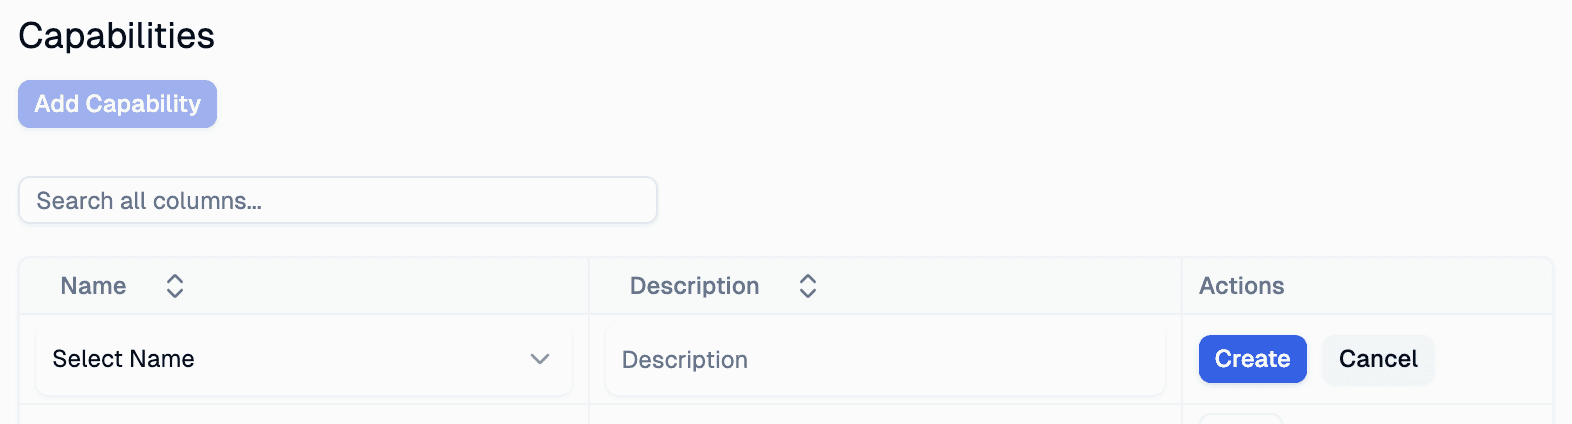
Step 4: You'll see a table where you can start building your capability list. Click the Add Capability button.
Step 5: Fill in the details:
- Name: Give your capability a clear name (e.g., "Web Development", "SEO", "Analytics")
- Description: Add a brief description of what this capability covers
- Click Create to save
Step 6: Repeat this process for each capability your team offers.
Here's how you could add that to your starter guide:
Need Inspiration?
Here's a full guide with capability ideas organized by agency type to help you get started.
But if you're in a hurry and don't want to check the full guide right now, here are some quick ideas to get your wheels turning:
Growth Marketing Agency:
- Web Development
- Search Engine Optimization (SEO)
- Analytics & Reporting
- Paid Advertising (PPC)
- Content Marketing
- Email Marketing
- Conversion Rate Optimization
Creative Agency:
- Graphic Design
- Brand Strategy
- Copywriting
- Video Production
- Photography
- Social Media Creative
- Print Design
Digital Agency:
- Web Development
- UX/UI Design
- E-commerce Development
- Mobile App Development
- Digital Strategy
- Technical SEO
For a complete list including Branding, Webflow, Paid Marketing, Influencer, and Consulting agencies, check out the full capability guide.
2. Add Your Team Members
Now that you've defined what your team can do, it's time to add the people who actually do it. This step ensures everyone has access to Supervisible and their availability is properly tracked for accurate capacity planning.
Step-by-Step Setup:
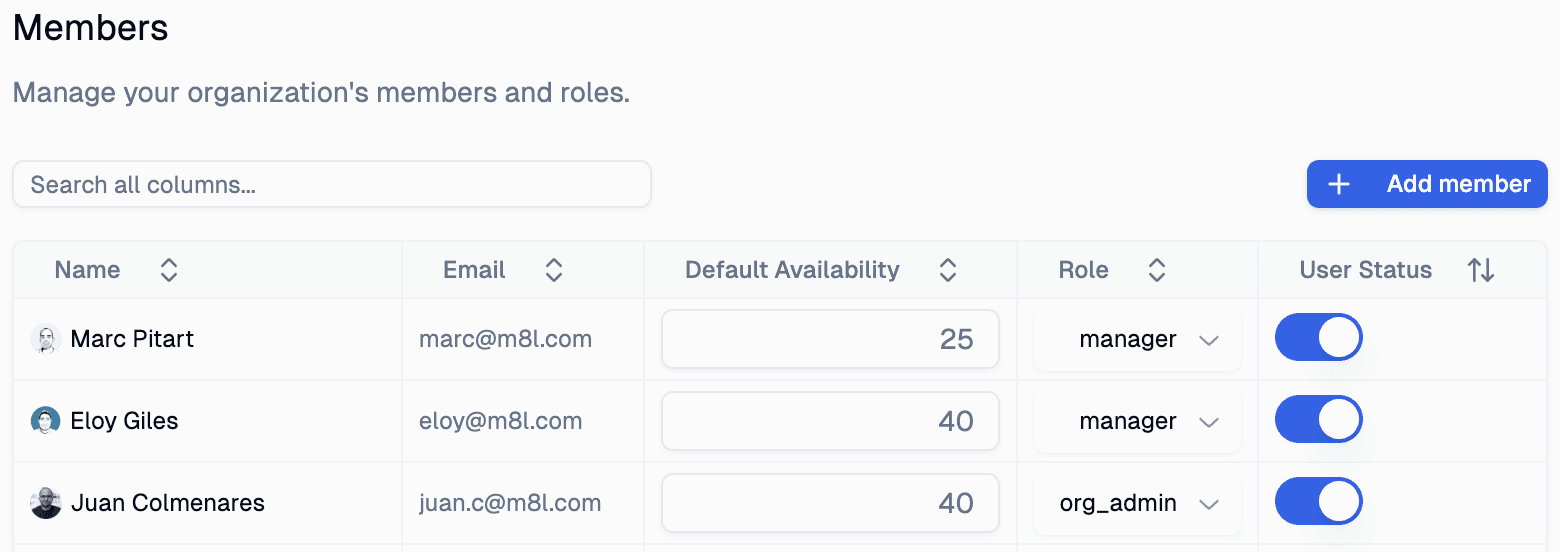
Step 1: In the left sidebar, click Members.
Step 2: You'll see a table of your current team members. Click the blue Add Member button to invite someone new.
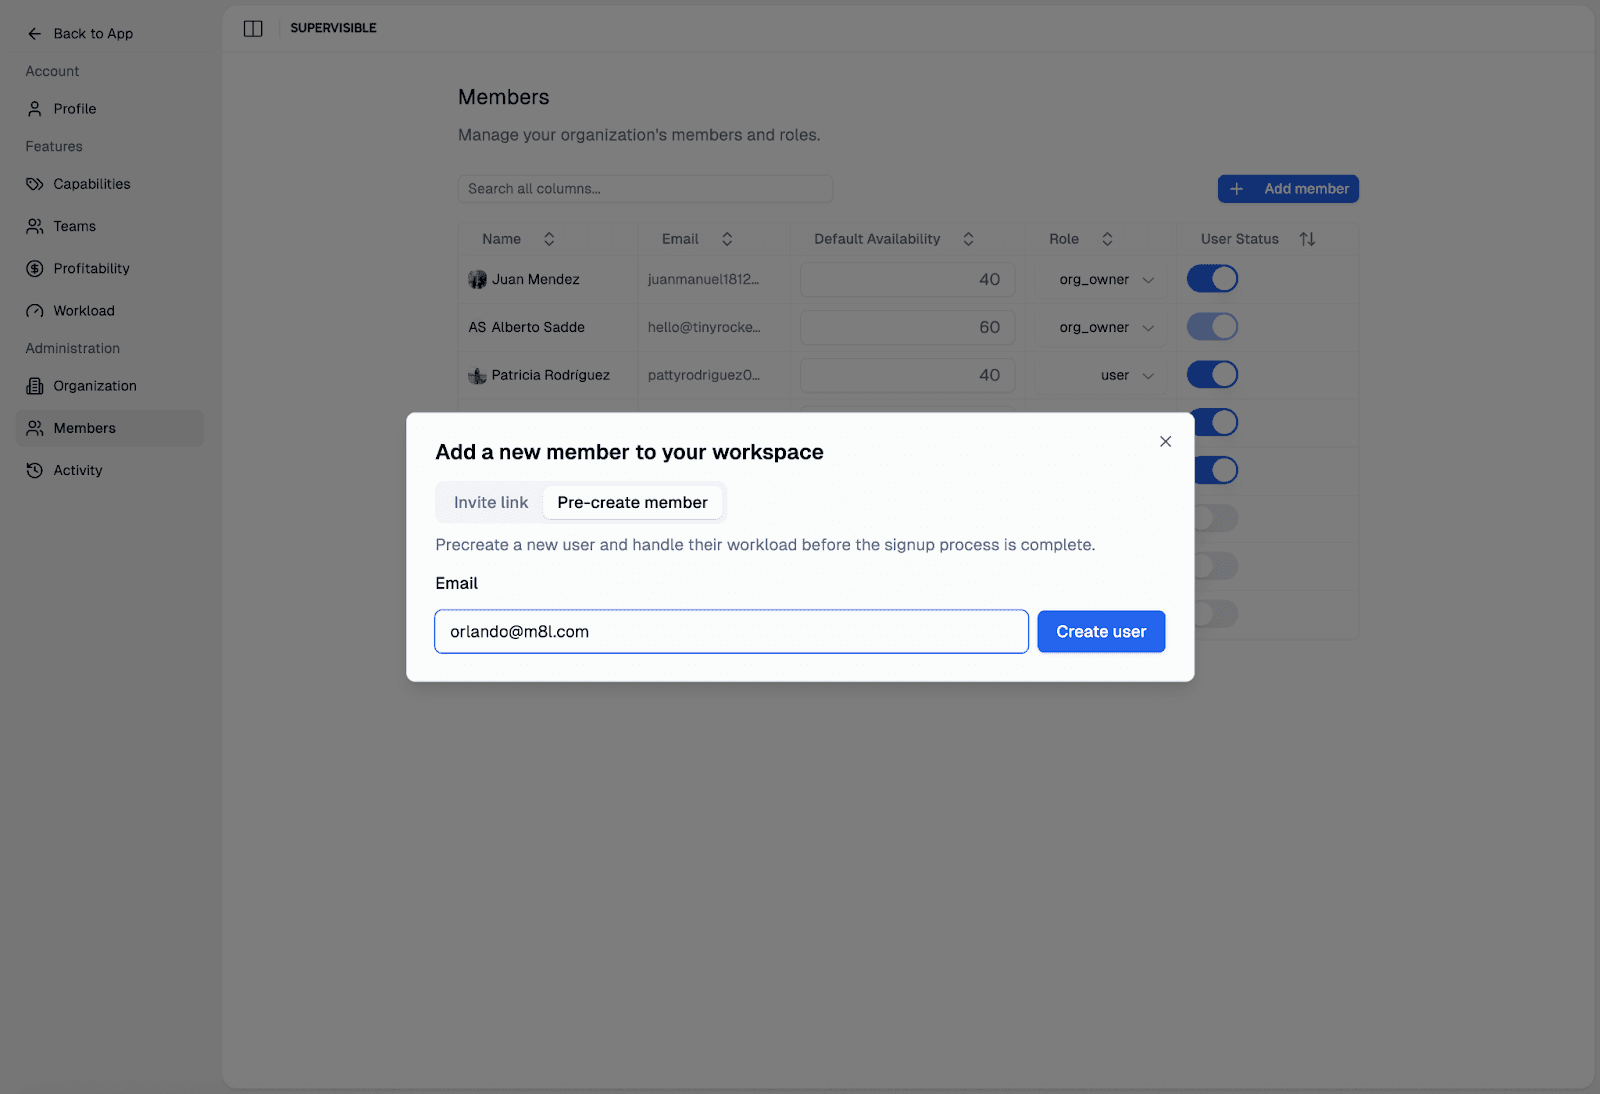
Step 3: A pop-up will appear with two invitation options:
Option 1 - Invitation Link:
- Copy the invitation link provided
- Share it with your entire team via email, WhatsApp group, or Slack channel
- Team members can join Supervisible directly using this link
Option 2 - Pre-create a Member:
- Click the "Pre-create a member" tab
- Enter the person's email address
- Click "Create user" at the bottom
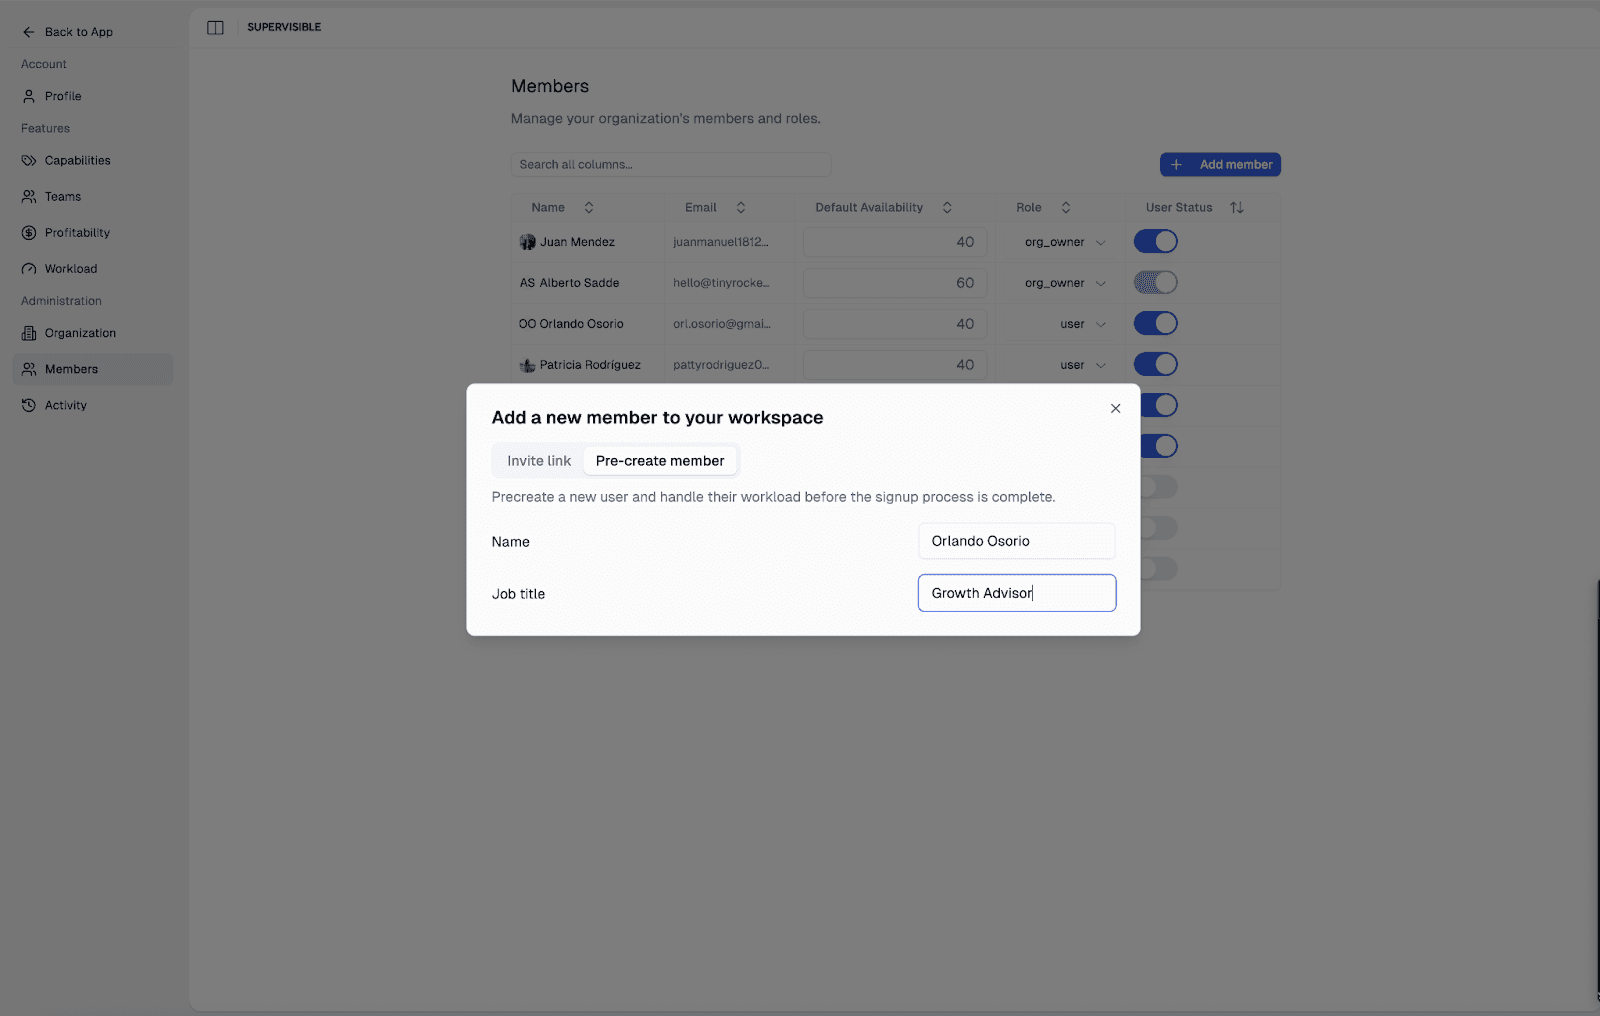
If You Choose Pre-create a Member:
Step 4: After creating the user, you'll see two input fields:
- Full Name: Enter the team member's complete name
- Job Title: Add their role (don't worry—they can update this later)
Step 5: The window autosaves your changes. You'll see a green notification in the bottom-right corner when information is saved.
Step 6: When finished, click the X to close the window.
Understanding Default Availability
For pre-created members, you'll also need to set their Default Availability - the weekly hours this person dedicates to your agency.
Important: At this point, we're not talking about billable vs. non-billable hours. Just put the entire amount of time this person works for you. Supervisible will help you manage billable and non-billable time allocation later in the app.
Examples:
- Full-time employee: 40 hours/week (adjust based on your country's standards)
- Part-time employee: 20 hours/week
- Contractor/Freelancer: Whatever hours they commit weekly to your projects
- Consultant: Their contracted weekly hours with your agency
Tip: Be realistic here. If someone officially works 40 hours but realistically has 35 hours for project work, use 35.
If you have any doubts about the billable vs. non-billable concept, here's a complete guide about billable and non-billable hours with practical examples to help clarify.
Role Permissions
Choose the appropriate role based on what this person should access:
- org_owner: Full organization access
- org_admin: Organization administration
- manager: Manages projects and team members
- user: Regular team member
For detailed information about what each role can and cannot do, check out our complete permissions guide.
Step 7: Repeat this process for each team member.
Pro Tip
The invitation link is perfect for getting your whole team onboarded quickly, while pre-creating members gives you more control over individual setup. Choose the method that works best for your team's workflow.
3. Assign Capabilities to Team Members
This is a critical step that connects your team's skills to your defined capabilities. Important: You won't be able to create projects until capabilities are assigned to your team members, so don't skip this step!
Step-by-Step Setup:
Step 1: Click "Back to app" in the top-left corner to return to the main dashboard.
Step 2: In the left sidebar, click Members.
Step 3: You'll see a list of your team members. Note that you'll only see:
- People who have clicked the invitation link and signed into the platform
- People you manually added in the previous step
Important Decision Point
If you're eager to start uploading projects and don't want to wait for your entire team to sign in, you have two options:
Option 1 - Wait for Team Sign-in:
- Organize a team meeting where everyone joins immediately
- Send reminders for team members to click their invitation links
- Wait a few hours or days for everyone to register
Option 2 - Manually Add Everyone:
- Go back to Step 2 and pre-create each team member manually
- This gives you full control and removes any blocking issues
- You can proceed immediately with project creation
⚠️ Critical Alert
You cannot create projects until capabilities are assigned to team members. This is a hard requirement in Supervisible because projects need to know which team members can perform which types of work.
What you CAN do without this step:
- Add all your clients to the system
- Set up your agency rate benchmarks
- Configure basic settings
What you CANNOT do without this step:
- Create any projects
- Assign work to team members
- Start tracking time and profitability
The Client-Project Relationship
In the next sections, we'll explain how clients and projects work together:
- Every project must be attached to a client
- Every project must have team members with assigned capabilities
- This structure enables accurate capacity planning and profitability tracking
Recommendation
For the smoothest onboarding experience, we recommend manually adding your core team members so you can immediately proceed to project creation. Team members can always update their own information once they sign in later.
Ready to move forward? Make sure you can see your key team members in the Members list before proceeding to the next step.
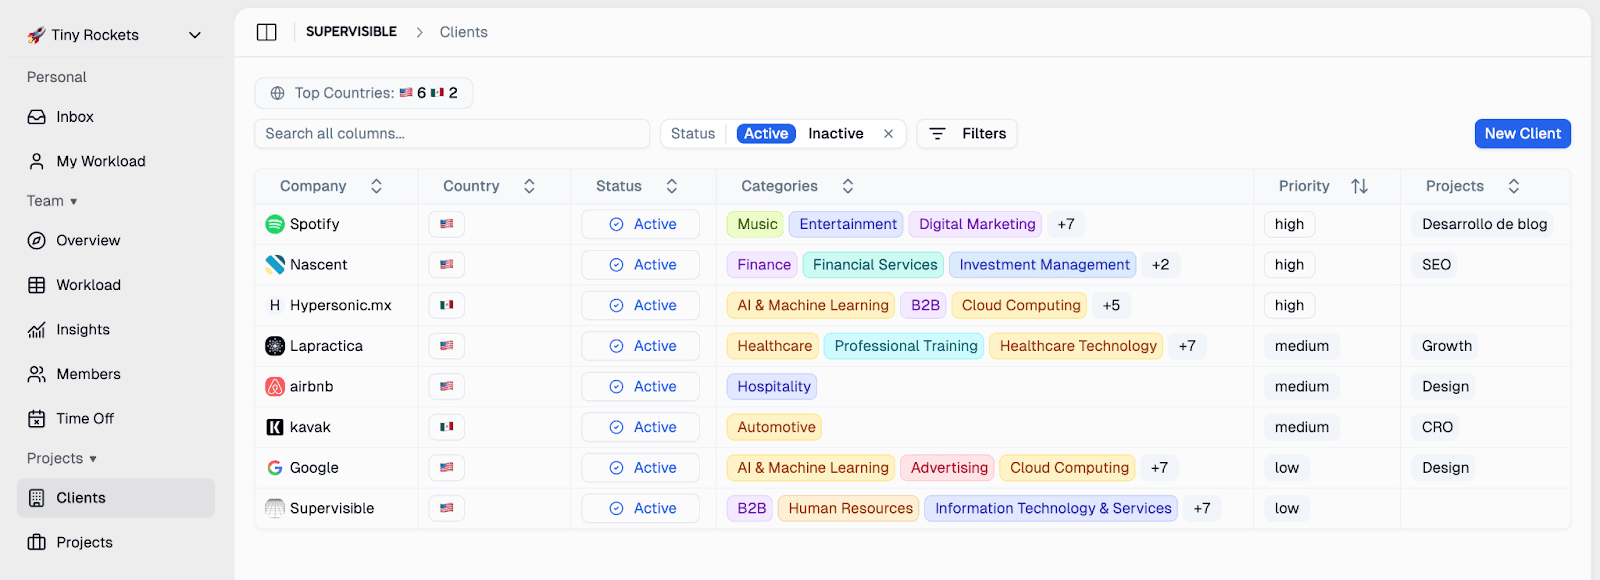
4. Add Your First Client
This is where things get exciting! Adding your first client will bring all your previous setup together and show you how Supervisible transforms scattered client information into organized, actionable data.
Step-by-Step Setup:
Step 1: Click Back to App in the top-left corner to return to the main dashboard.
Step 2: In the left sidebar, click Clients.
Step 3: You'll see your clients overview page. Click the New Client button in the top-right corner.
Step 4: In the pop-up window, enter your client's website URL in the website field.
Step 5: Here's the magic—if your client has a decent website, Supervisible will automatically scrape and populate:
- Client name
- Company logo
- Country location
- Business description
- Industry tags

Step 6: Review the auto-populated information and make any adjustments:
- Click any input field to edit the suggested information
- Update the client name if needed
- Replace the logo if you have a better version
- Adjust the description to match your internal notes
Step 7: Set the Priority Toggle based on your internal client segmentation:
- Use this to categorize clients by importance, revenue size, or strategic value
- This helps with filtering and reporting later
Step 8: Click Create Client to save.
Pro Tips:
- Website Quality Matters: The better your client's website, the more accurate information Supervisible can extract. For clients with minimal web presence, you'll need to fill in details manually.
- Priority System: Consider creating a consistent priority system (e.g., A-tier for high-value clients, B-tier for standard clients, C-tier for small projects).
- Don't Overthink It: You can always edit client information later. The goal is to get your first client in the system so you can start adding projects.
Step 9: Repeat this process for two to three clients. You don't need to upload every single client now because it's more important to create your first project as soon as possible.
Here's the updated Step 5 with the complete project creation process:
5. Create Your First Project
Now for the core of your workflow—adding projects! Remember, every project in Supervisible must be attached to a client, which is why we created clients first. Once you have clients set up, you can add unlimited projects to each one.
Step-by-Step Setup:
Step 1: Choose one of two ways to create a project:
Option A - From Client View:
- Stay in the Clients section
- Click on the client you want to create a project for
- Click New Project in the top-right corner
Option B - From Projects Section:
- Click Projects in the left sidebar
- Click New Project in the top-right corner
Step 2: Fill Out the Project Details
Now you'll see a modal with several fields to complete:
Project Title: Give your project a clear, descriptive name. Here are some examples:
- SEO and content strategy
- Web development
- Identity branding project
- Social media marketing campaign
- E-commerce website development
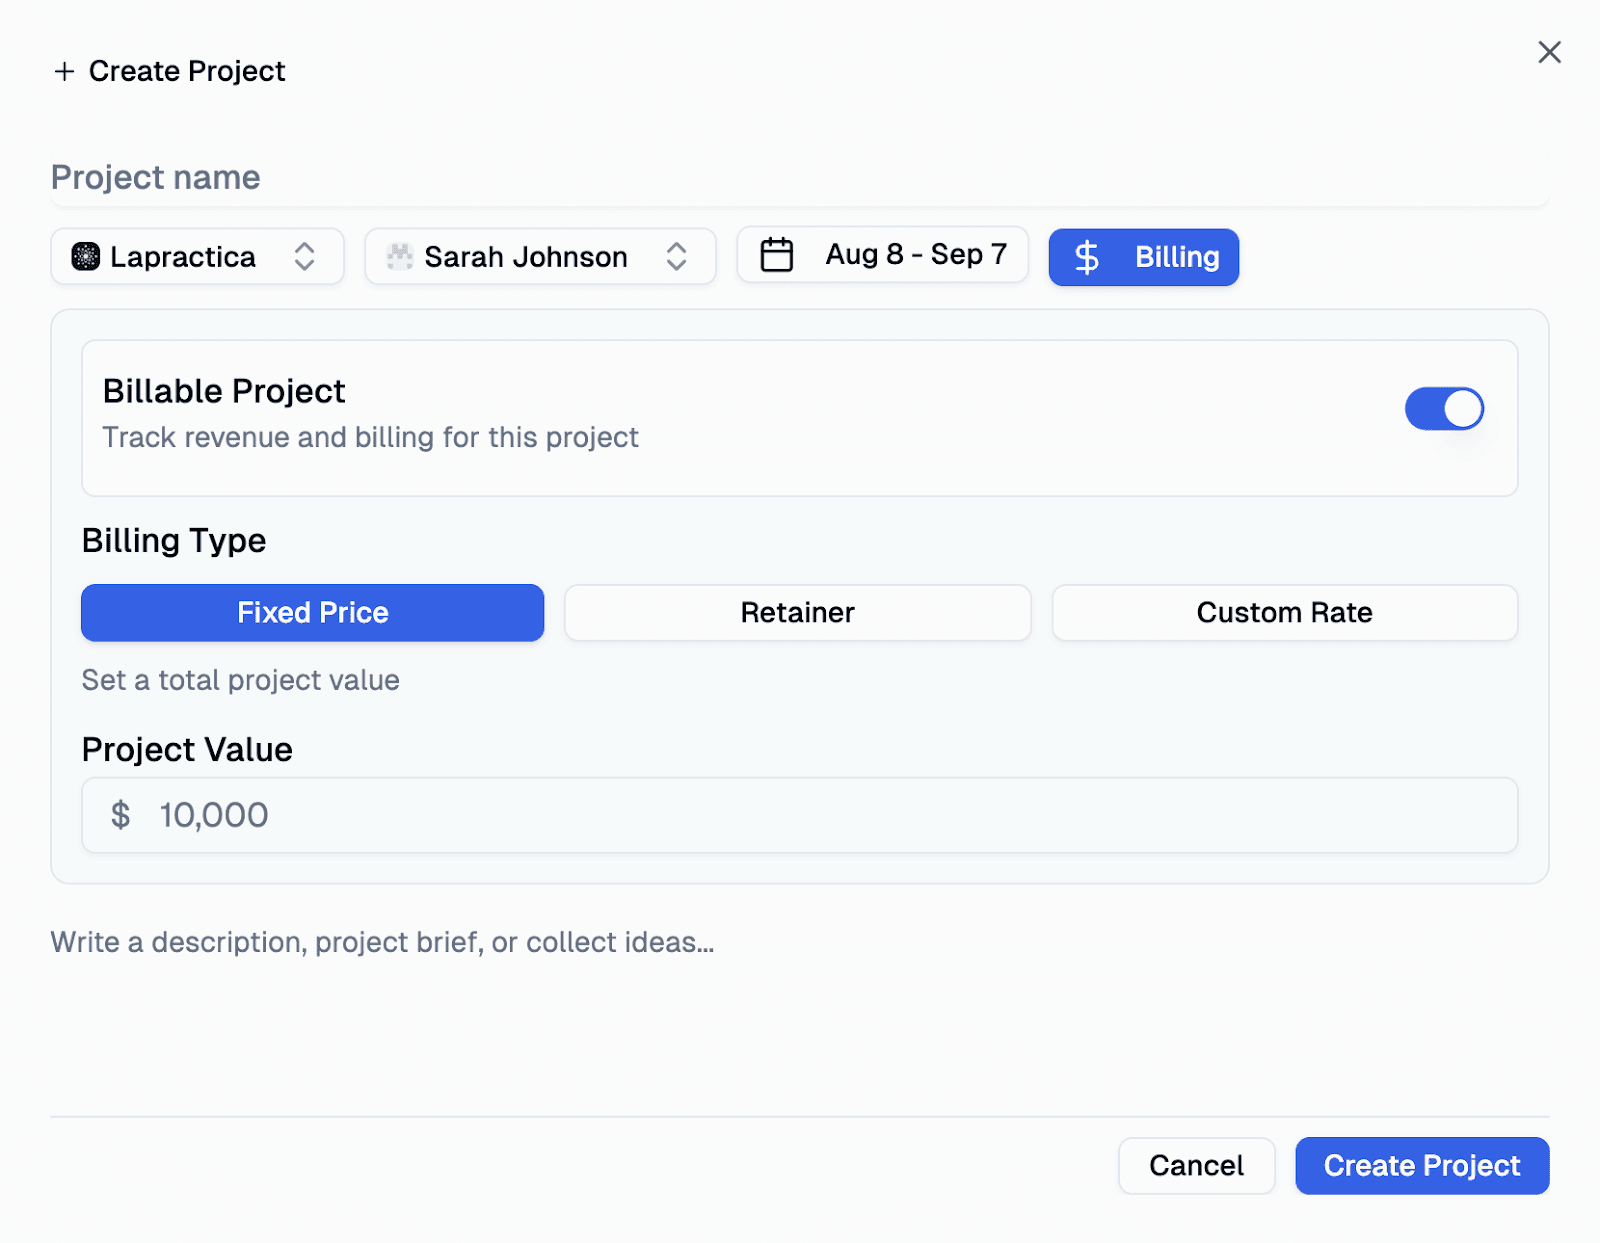
Client Selection: Click on the left to select which client this project belongs to.
Project Manager/Account Manager: Choose who will be the main leader and point of contact for this project from your team.
Timeline:
- Start Date: When the project begins
- End Date: When you expect to complete the project
- Don't have a specific end date? Add something referential—you can always adjust it later
Billing Configuration: This is a crucial decision that affects how you track profitability:
Billable vs. Non-Billable Toggle:
- Billable: Time spent on this project can be charged to the client
- Non-Billable: Internal projects, pro bono work, or business development
Billing Method (for billable projects):
- Fixed Price: An entire project scope for a set amount (e.g., $10,000 for 5 landing pages over 3 months)
- Retainer: Monthly recurring payment from the client
- Custom Rate: Hourly billing based on a project-specific rate
These are the most common billing methods for agencies and consultants. We may add other options in the future—if you have specific billing needs, please reach out to us!
Need help choosing the right billing approach? Check out our complete guide to agency billing frameworks with detailed examples, pros and cons, and strategic guidance for each pricing model.
Project Description: Use the white text box to add context about the project scope, goals, or any important notes.
Keep Descriptions Simple: Don't paste docs or URLs in the project description field. In the next view, you'll have a dedicated place to add frequently accessed links, such as the final proposal or project contract, so you can keep them handy.
Step 3: Click the blue Create Project button in the bottom-right corner.
Why These Details Matter
- Clear titles help your team quickly identify projects
- Assigned managers ensure accountability and client communication
- Realistic timelines improve planning and client expectations
- Proper billing setup is essential for accurate profitability tracking
- Good descriptions provide context for anyone working on the project
Pro Tip
Start with a current, active project rather than a completed one. This will give you the best experience learning how Supervisible tracks ongoing work and helps with day-to-day project management.
Here's Step 6 for your starter guide:
6. Assign Team Members and Plan Resources
This is where your project planning comes to life! You'll assign team members to the project and allocate their time across the project timeline. This step is crucial for accurate capacity planning and preventing team overallocation.
Understanding the Project Overview
At the top of your screen, you'll see key project indicators:
- Project dates (start and end dates)
- Monthly amount (if you chose retainer billing)
- Project manager assigned to lead
- Total project duration
Project Documents
On the right side, you'll find a section to upload links to relevant project documents. This is the perfect place for:
- Final project proposals
- Signed contracts
- Brand guidelines
- Client brief documents
- Reference materials
Team Assignment and Resource Planning
The main action happens on the left side:
Step 1: You'll see the project manager is already assigned from your project setup.
Step 2: Click the Add Row button to assign additional team members.
Step 3: For each row, select:
- Team member from your roster
- Primary capability they'll use for this project
Step 4: Plan their time allocation across the project timeline:
- Each column represents one week of the year
- Enter the estimated hours you'll need from each person per week
- Consider project phases and dependencies when planning
Strategic Tips for Team Assignment
Multiple Capabilities: If someone has multiple skills (e.g., web designer who also codes), you have two options:
- Granular tracking: Assign them twice with different capabilities for detailed metrics
- Simplified tracking: Assign them once with their primary capability
Time Allocation Strategies:
- Flat allocation: Same hours every week (good for steady work)
- Phase-based allocation: Varies by project phase (e.g., designers heavy at start, developers heavy in middle)
- Seasonal consideration: Adjust for holidays, vacations, or client schedules
Pro Tips
Excel-Style Functionality: You can select a cell and drag right to copy the same hours across multiple weeks (just like Excel or Google Sheets). Note: You can only drag horizontally (left to right), not vertically.
Start Realistic: It's better to underestimate initially and adjust than to overcommit your team from the start.
Consider Buffer Time: Leave some capacity unallocated for unexpected changes or scope adjustments.
What Happens Next
Once you've assigned your team and planned their time:
- Supervisible will show you team capacity and potential conflicts
- You'll be able to track actual vs. planned hours as work progresses
- Profitability indicators will help you understand project health
- You can adjust allocations as the project evolves
Congratulations! You've now set up your complete project in Supervisible. You have your team assigned, time planned, and all the foundation needed to track this project's success from start to finish.
Know Your Capacity. Grow Your Profit.